
Copper pillar testing
- Sensor accuracy ±0.075%
- Down to 35µm diameter copper pillars
Introduction
Copper Pillar is rapidly being adopted as a bumped wafer interconnect. The construction is that of a Copper cylinder around 50µm in diameter and height, topped with a dome of solder.
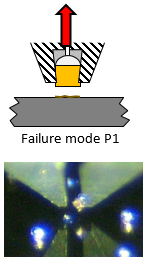
As with any interconnect the quality of the bonding process between the different parts is vital for the reliability of the finished product. The bond between the copper and its pad on the wafer are of particular interest as this is seen as the most likely failure mode. In a bond test a failure mode between the copper and wafer is then the “Failure mode of interest”.


Pull testing
This failure mode can be produced by either a pull or a shear test and the measured bond strength used for your process control. In many other applications pull testing is typically preferred because the bond is subjected to a simple tensile load, distributed over the bond area. The bond separation is clean making failure mode analysis of the surfaces relatively easy. Unlike solder bumps, Copper is relatively hard and gripping it therefore easier.
Solder balls require precise reforming in order to be able to apply a meaningful test load on to the bond. Copper also has to be reformed in order to be able to grip it but this takes the form of well know gripping methods such as plain surfaces and friction, a few serrations that slightly reform the copper in order to get a mechanical grip or a slight tapper.
Shear testing
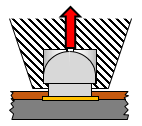
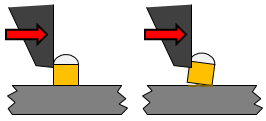
An alternative to pull testing is a shear test. If this is done with a very low shear height the bond is subjected to mostly shear. If a high shear height is used the bond is loaded by shear and a bending moment. It is though the bending loads, and in particular the tension side of the bending moment, that typically cause the bond to fail. The pillar tends to pivot on its edge furthest from the shear tool, making the failure mode very similar to that of a pull test.
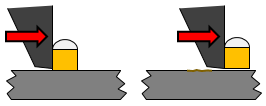
The advantages of a high shear test are that the tool and test are much simpler. Making pull tweezers with 50µm cavities is difficult and costly. Aligning them to the pillar takes time and requires skill. A shear test is no different to that commonly used when testing wire bonds. The only difference being the shear height is bigger. The tools cost a lot less and its alignment to the pillar is not so critical, making it less skilled and faster.
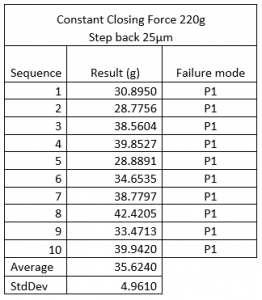
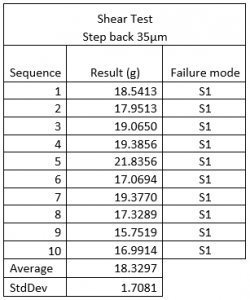
Variations in shear height will cause variations in the test result but with the Sigma accuracy of ±1µm these affects are likely to be less than those caused by the grip reforming and operator misalignment in a pull test. It is though beneficial to test with the highest possible shear height as this reduces any effect from the small variations in height and assures that the bending moment dominates the failure mode.

For a solder ball a Cold Bump Pull test is known to be better than shear. A 1st bond Gold ball test is best done with a low shear height. The reason for both of these comes from our “Golden rules of bond testing” ©, they both produce the highest number of failure modes of interest or the highest possible test force.
In the case of Copper pillars we should be guided by these same rules. Shear is the simplest test and it does produce the failure mode of interest. The optimum shear height will be the one that maximizes this or produces the highest test force.
Choose between pull and shear testing
The choice between pull or shear testing depends on the application and the test objectives. If you are interested to find out more please contact us for more information, to request a demonstration or a quotation.

