How to: Cold Bump Pull (CBP)
This manual is a guide advising what to consider and how to perform an optimal Cold Bump Pull (CBP) test. This manual focuses on solder ball testing, but the principles apply equally to most bump testing.
This extensive how-to consists of 12 paragraphs. You can use the table of contents on the right to navigate between sections.
What is Cold Bump Pull (CBP)
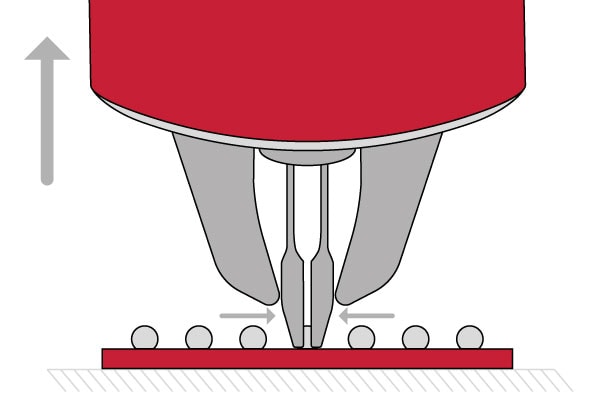
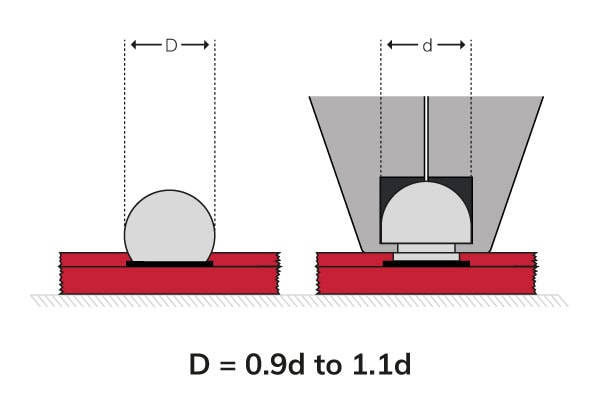
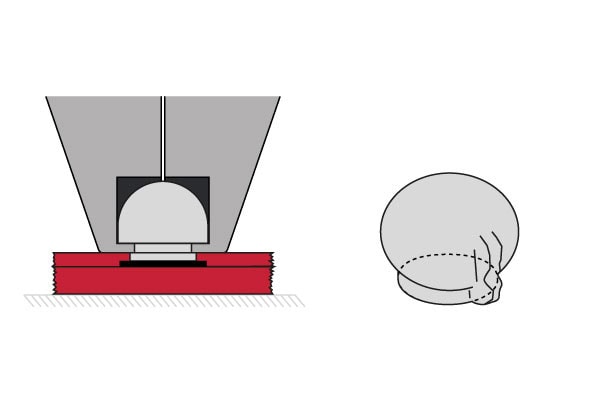
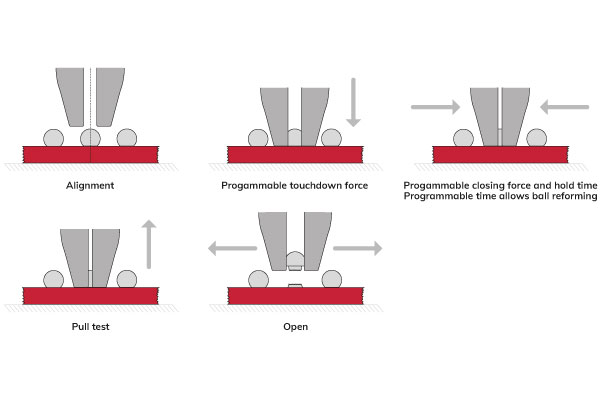
CBP stands for Cold Bump Pull or Cold Ball Pull. To pull the ball it is necessary to reform the ball in a “mushroom” shape with a tweezer. Tweezers have special gripping jaws with cavities that reform the ball when the tweezers close. The jaws of the tweezers provide the pull grip. The tweezer applies an upward force and effectively pulls the ball away from the substrate, moving the Z-stage until the bond breaks or a pre-defined force threshold is achieved.
Do not worry about reforming the ball. Reforming is due to the load on the tool. It is better to get a higher test force by “over gripping” the ball so that the reforming cuts over the bond, rather than “under gripping” the ball and risking unrealistic failure modes in the bond. Remember: Always seek to test the bond of interest in a way that generates the failure mode of interest, or the highest force.
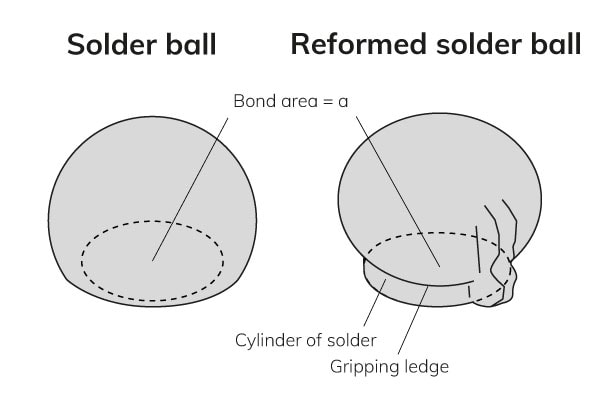
Ideally, the “stem” of the mushroom shape should be larger or the same diameter as the bond area. It is better if over gripping tests the bond at a higher force. Over gripping can still lead to getting a ductile break or extrusion, but the bond has been tested to the highest force possible.
Type of balls to test
The CBP test method is the ultimate solution for solder ball testing, but the principles apply equally to most bump testing.
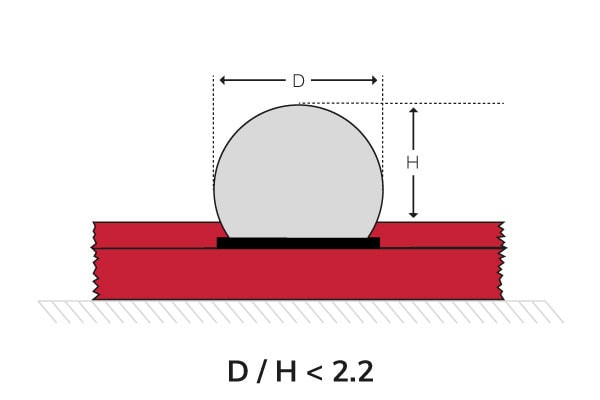
Low bumps are harder to grip. Therefore, the ball height-to-diameter ratio (diameter/height) should be less than 2,2. Solder balls with values above 2,2 should use shear testing. As always, the rule is to choose the test that gives the most failure modes of interest, and if none of them do this, select the test that produces the highest test forces.
Ball pull testing typically produces more failure modes of interest (bond or pad failures) than shear testing and therefore produces more informative test data. However, ball pull tests are more time-consuming.
Tool design
Tweezers
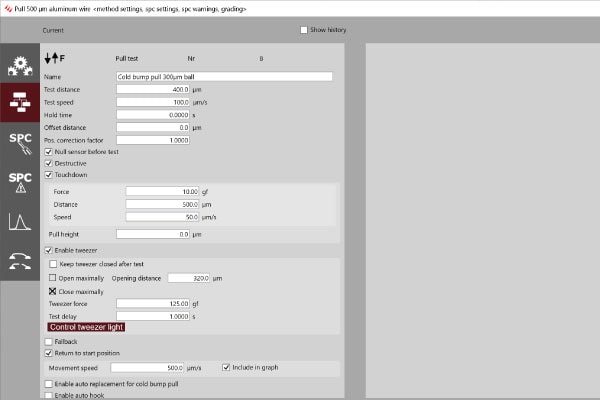
USB tweezers can fully control the gripping force and the opening and closing distance. Tweezers have all features for Cold Bump Pull testing:
- Programmable open position
- Programmable touchdown force
- Programmable distance from surface
- Programmable constant grip force
- Programmable hold time
- Programmable return to start position
- Automatic contactless CBP Jaw Cleaner system
- RMU houses up to 6 USB Tweezers to enable the fastest change-over between jaw cavity sizes
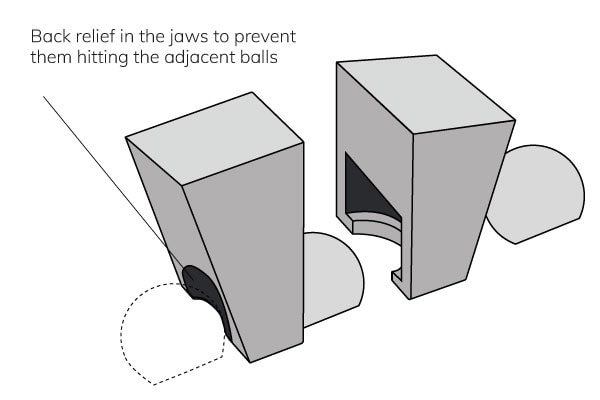
The gripping jaws (tweezers with tips) are driven by a built-in, closed loop,
3-phase brushless micro-drive to accurately open and close. The jaw actuators incorporate a strain gauge to precisely measure and control the gripping force. Ball pull jaws have a cavity to reform the ball. The edges of the jaws provide the pull grip. Use jaws with back relief if the bumps are very close to each other.
Tool quality
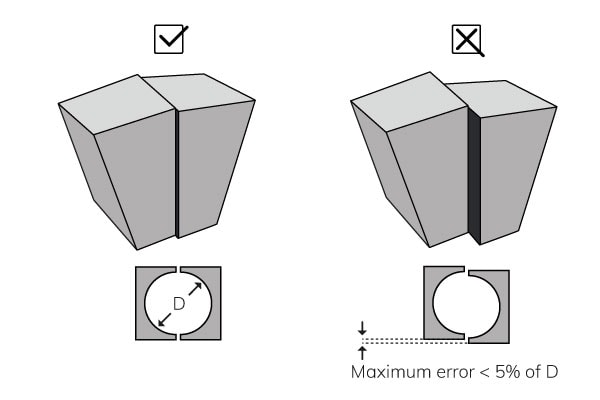
To reform, grip, and pull a ball with the maximum force possible, the jaws must be of suitable quality and without broken, worn, or rounded edges. Therefore, it is essential to monitor jaw quality during use.
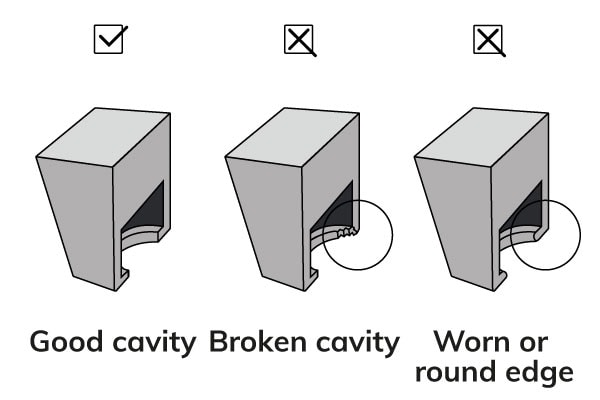
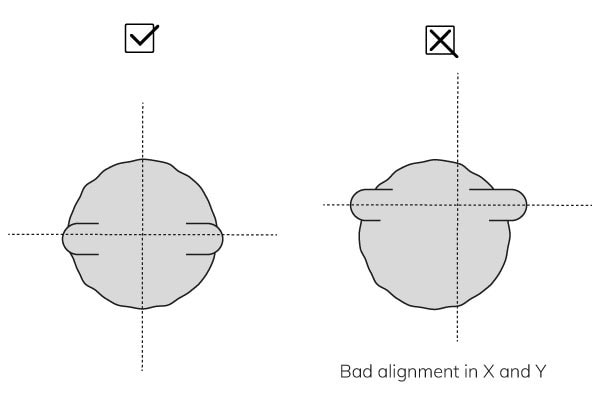
The 2 jaws must align as well as possible. The maximum error of any misalignment side to side and closing height is 5% of the ball diameter. Cavity contamination is also a cause of poor jaw quality, reducing the grip force.
Cleaning jaws
Bump debris builds up in the cavities of the jaws. Therefore, it is essential to clean the jaws before starting a new test to maintain efficient grip and consistent bump testing. It is easy to remove contamination manually with a brush or a needle, but do not damage the jaws and cavities.
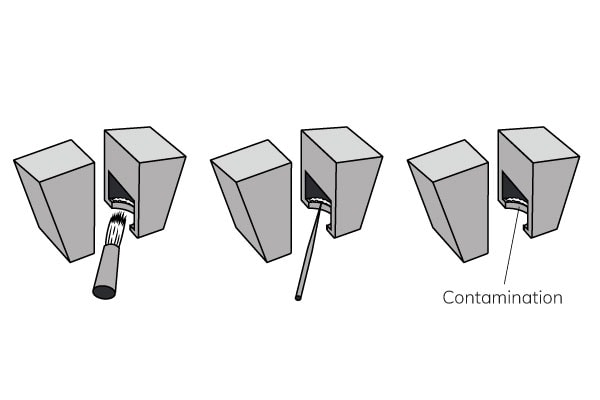
Automatically remove solder debris with a CBP jaw cleaner. This contactless cavity cleaner melts the solder with a high temperature and high-pressure air jet and then blows it into a fine safe material where it is absorbed.

Tool alignment
The first step of doing a Cold Bump Pull test is the alignment of the jaws to the bump. Aligning comprises of the jaw opening and centering the jaws above the bump.
The jaw opening may not hit the bump or others around it when they descend to grip.
Set up jaw alignment in X, Y and Z
Set the test method to “return to the start position.”
Align the jaws over the bump before starting a test. First, set the Z height, so the bottom of the jaws is just above the tops of the bumps. The closer they are, the easier it is to make the alignment in X and Y. Make sure there is sufficient clearance not to touch the highest bump. Also, make sure to select the “return to the start position” option when the bump pull is complete. The set height will remain when aligning for the next tests.
Once the height is set, align over the bump, so the jaw cavities are concentric with it.
- Click the “Enable tweezer” checkbox.
- Uncheck the “Open maximally” checkbox
- Adjust the “Opening distance” in the method so that tweezers do not hit the adjacent balls.
Set up grip force and practice X and Y alignment
Warning: Operate these steps very carefully!
- Set “Tweezer force” to 5 grams (or near equivalent in the chosen units) for specifying the closing force.
- Press the special function key to manually close the jaws.
- The 2 jaws will not close completely.
- Open the jaws by pressing the special function button.
- Increase the closing force by another 5 grams and close again.
- Repeat this until the jaws touch.
- This is the force required just to close the jaws. Additional force from here will be that which reforms the ball.
- The closing force to reform a ball varies due to its size and construction.
- Jaw closing forces should be set on a case-by-case basis, depending on a specific bump test. Use force increments of 10g until identifying a force that just closes the jaws.
Test or practice the closing on a bump to get used to the X and Y alignment and to set an initial jaw closing force. Choose a bump and align over it, then manually (slowly) drive down to just touch the substrate.
- Press the special function button to close the jaws.
- Wait 5 seconds and press the special function button to open them.
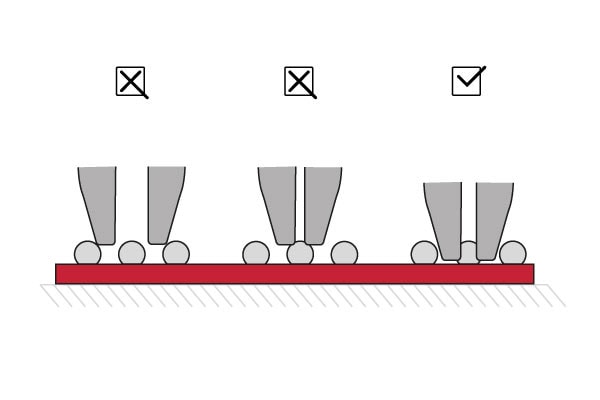
- Raise the jaws and look at the amount of reforming.
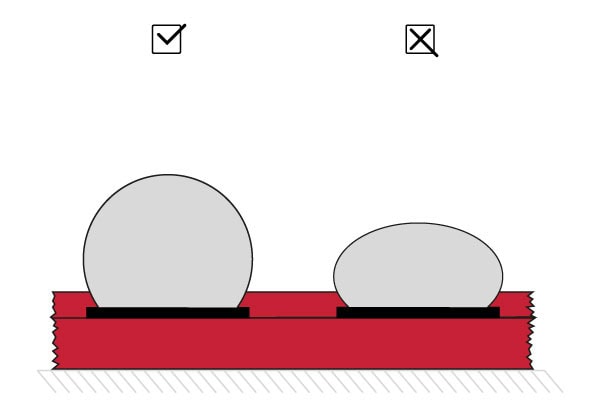
- Get slightly less reforming balls than these pictures below. This is called “under reformed”.

- As the closing force is low, it will probably be needed to increase the closing force by another 10g, close and wait 5 second again.
- Repeat until the ball is slightly under reformed.
Observe the bump and look at the XY alignment. Next, try reforming another bump and again look at the XY alignment. Repeat this until the results are acceptable.
Set up closing time
The jaws take time to close, and the bump takes time to reform. Bumps of less than 100 µm reform almost instantly, where reforming a large bump of 750 µm can take up to 5 seconds. Therefore, we waited for 5 seconds when testing the first grips.
Observe how long it takes for the jaws to stop moving when testing the grip and alignment. To ensure the bumps will fully reform at the selected closing force, use the safe closing time delay (Hold time) in the test method program.
Set up landing force and alignment height
The Z axis drives the jaws down to touch the substrate to a programmable Touchdown force when starting a test. This force depends on the application. It should be as low as possible but sufficient to ensure the jaws come into good contact with the substrate.
The landing force can help the jaws slide past the adjacent bumps when the bumps are very close. This is acceptable only when the bumps are not significantly damaged.
Typical Touchdown forces should be:
- Bumps up to 150 µm about 10 grams
- Bumps up to 500 µm about 30 grams
- Bumps above 500 µm about 100 grams
Best results are obtained by trial and error but initially set the landing force as shown above.
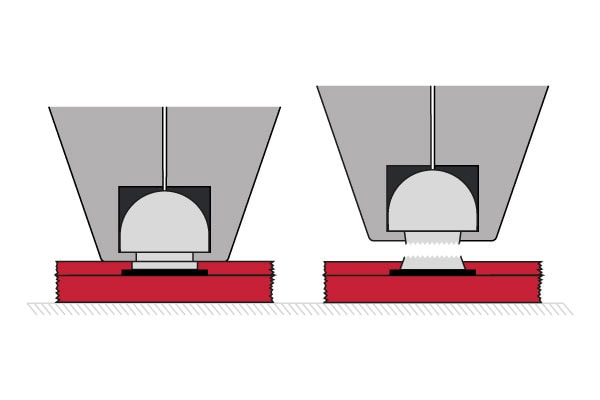
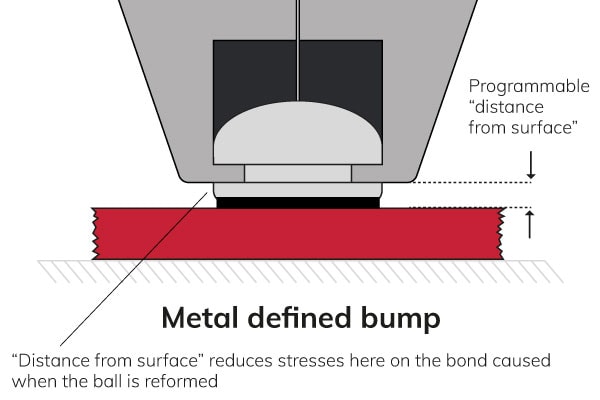
Most CBP tests require the jaws to close in contact with the substrate. This gives the strongest grip. However, in the case of metal-defined pads, a “pull height” may be required to avoid damaging the bond when the bump is gripped and reformed.
Metal-defined bumps often have low height and require a ”distance from surface” resulting in a poor grip force. On the other hand, the mask does not support the bond, so shear testing is often a better option.

Cold Bump Pull objectives
A bond test should produce the most failure modes of interest by applying the test load most like the true load. No failure mode of interest? Test with the highest force possible.
Golden Rules of Bond Testing
- Choose the test type and setting that gives the most failure modes of interest
- No failure mode of interest? Choose a test type that tests the bond with a load most similar to the true loading condition
- Choose the test settings that produce the highest force
1. Most failure modes of interest
CBP testing focuses on the strength of the bump to the pad and/or the pad to the substrate. This is the “bond”.
The construction of the bond varies depending on the application. There can be a few or many layers in the bond. The objective is to know how the bond fails and at what force.
2. Load most similar to the true load
Pull testing is more like the true loading condition and produces more failure modes of interest.
3. Apply the highest force possible
The failure mode is ductile or extrusion if the bond is stronger than the bump. In this case, set up the test to get the highest force possible.
Note, if the extrusion force is only slightly higher than a ductile failure, it may be better to set the test to get ductile failures. This is because extrusions can contaminate the jaws with debris much more rapidly, making cleaning more difficult.
Optimizing CBP tests
The simple objective is to get bond failures (failure modes of interest) or the highest test force. Therefore, find and use the jaw-closing force that produces the highest test force possible.
Try a few tests with the initial settings and record the failure modes and test forces.
In most cases, the failure mode is an extrusion. So, first, increase the closing force until either a bond or ductile failure arises. If not, lower the grip force until the bond gets an extrusion. Then increase the grip force a little until all bond failures are produced.
No bond failures? Try different closing forces to find the one that gives the highest test force. The failure mode can then be extrusion or ductile. For balls above 100 µm it will probably be a ductile failure mode. For balls below 100 µm it is sometimes an extrusion.
When increasing the closing force, watch how long it takes for the bump to reform. Then, it may need to increase the Hold time.
Warning: Observe how the test force changes when increasing the closing force. If the test force starts to go down, there is no point in further increasing the closing force. The jaws can break if you carry on increasing it.
Test speed
Test speed will have minimal effect in standard CBP because all tests are relatively slow. This is because the jaws are locked into the sample by the grip.
Recommendations:
- For bumps up to 300 µm, use a test speed of 100 µm/s
- For bumps above 300 µm, use 200 µm/s to increase the number of tests per minute.
Test sequence recap
There are many ways to set up a test, but a typical test sequence is:
Expectable test forces
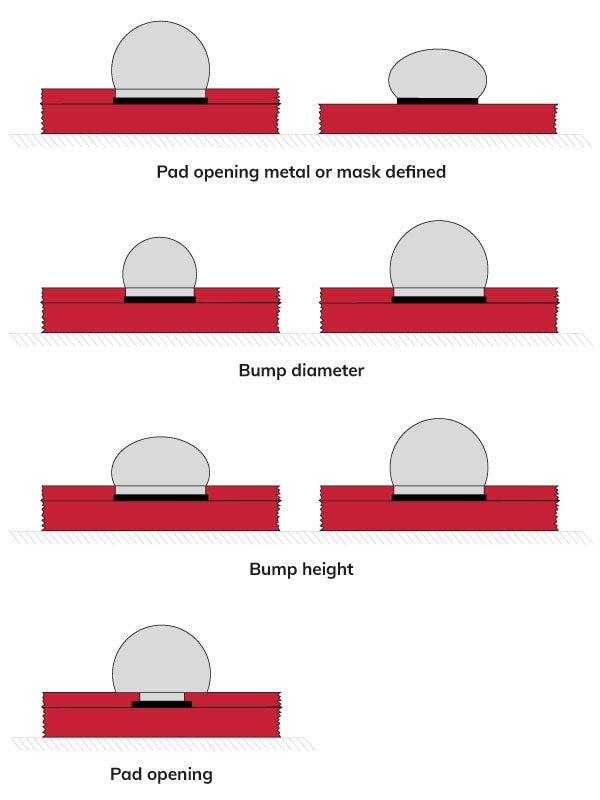
The construction of solder ball interconnects widely varies. Variables include:
- Pad opening either metal or mask defined
- Ball diameter
- Ball height
- Pad opening diameter
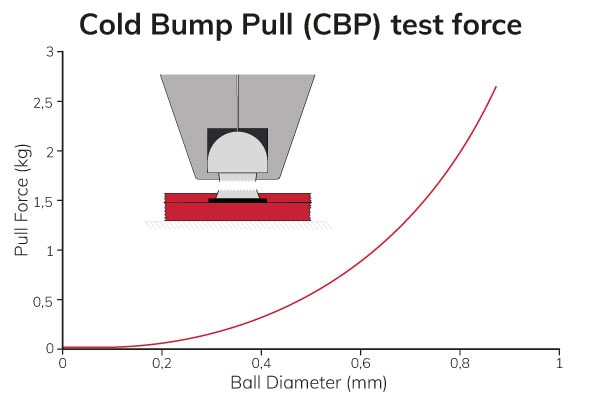
There are also many different bump alloys, pad alloys, pad surface finishes, reflow processes and aging. Because of this variety, there are no industry standards for bond strength. As a general guide based on the ductile failure and the strength of solder, the maximum test force for a ball diameter is shown in the graph below.
Failure modes
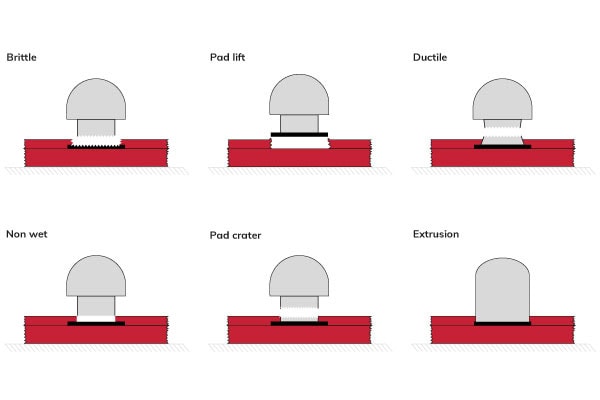
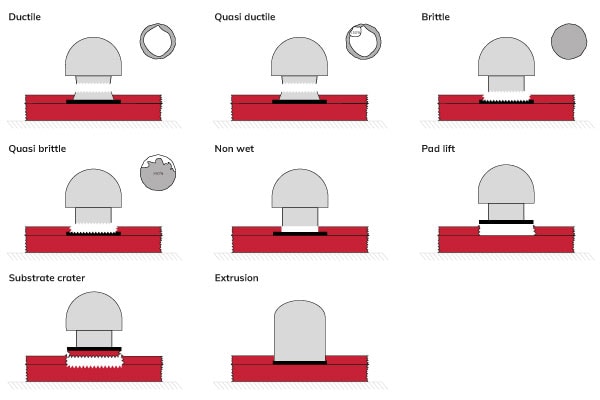
JEDEC sets the following 5 failure mode definitions and divides them into 8types. For full details check the JEDEC website.
- Mode 1, Type A: Ductile
Solder ball fracture at or above the surface of the solder mask within the bulk solder material.
- Mode 1, Type B: Quasi-ductile
Mixed ductile/brittle fracture with the dominant failure mode (>50% area) being ductile.
- Mode 2, Type A: Pad lift
Solder pad lifts with solder ball.
- Mode 2, Type B: Pad Crater
Lifted pad includes ruptured base material.
- Mode 3, Non wet
Solder ball lifts from pad and any portion of the pad top-surface plating is exposed.
- Mode 4, Type A: Brittle
The break is at the solder/intermetallic interface or intermetallic/base metal interface.
- Mode 4, Type B: Quasi-brittle
Mixed brittle/ductile fracture with the dominant failure mode (>50% area) being brittle.
- Mode 5: Ball extrusion
Solder ball is stretched but not fractured. Invalid failure – repeat test with replacement solder ball samples after appropriate adjustments.
The standards JEDEC JESD22-B115, JEITA EIAJ ET-7407 and IPC-9708 apply to Cold Bump Pull testing. Below is an overview of the most common failure modes for solder bump testing. It is also possible to download the result codes in our grading library.
Sigma bond tester
A Sigma bond tester is the most advanced bondtester for solder ball testing. It comes with game-changing automation capabilities and high specifications in:
- Sensor accuracy and resolution
- Large X stage
- Superior axis speed
- Cameras and illumination
- Future proof and modular design
Contact us an challenge us to customize a bond tester to solve your quality control processes.
